
Authoring and Installing ArgoCD-Operator as a Supervisor Service on vCenter
Introduction
To start, let's go over some fundamental concepts.
Supervisor Services
Supervisor Services in vSphere brings enhanced management capabilities to Kubernetes clusters. They simplify the deployment, scaling, and lifecycle management of Kubernetes services directly on the vSphere infrastructure via the Supervisor. This blog focuses on deploying a sample Sepervisor Services using ArgoCD-Operator as a Supervisor Service, combining the power of Kubernetes operators with vSphere's Supervisor framework.
Carvel Packaging
Carvel is a suite of tools that streamline Kubernetes applications' packaging, installation, and management. One essential tool, kctrlplays a crucial role in this blog by simplifying the deployment process of ArgoCD-Operator as a Supervisor Service. Currently, the Supervisor only supports Carvel-based packaging to deploy and manage Supervisor Services. The kapp-controller running within the Supervisor controls this feature.
Operator Pattern in Kubernetes
The operator pattern in Kubernetes extends life cycle automation by encapsulating operational knowledge for specific applications. ArgoCD-Operator follows this pattern, automating the deployment and management of ArgoCD, a declarative GitOps continuous delivery tool for Kubernetes.
Disclaimer — While extremely powerful as a packaging solution, Carvel packaging is a bit of a challenge. Writing YTT overlays to customize Kubernetes manifests as per requirements can be challenging and requires expert YAML authoring skills.
With limited documentation and examples available online, this article was purposely written to deploy an Operator as a Supervisor Service. Operator manifests are generally relatively simple, with very few customizations needed. It typically comprises a few CRDs, controllers running as deployments, and supporting RBAC and services.
Now that we have covered some concepts and ideas, let's move on to how to create and deploy Supervisor Services.
Disclaimer: The concept of Bring Your Own Supervisor Services demonstrated in this article may not be supported in production.
Requirements
To proceed with this guide, ensure the following prerequisites are met:
- A fully configured Supervisor on vSphere v8.0+. For the article, the process was tested on the Supervisor running Kubernetes
v1.26.4+vmware.wcp.0 - Carvel binaries installed, mainly
kctrl,ytt,imgpkg,kbldandvendir. Most could be installed as statically complied binaries or leveraging Brew on MacOS. - Access to the registry to upload the compiled package artifact.
Steps
1. Clone the scaffolding Repository
This repository includes a bash script that generates scaffolding of the directory structures and sample YAML manifests. Use of this script is optional.
$ git clone https://github.com/papivot/supervisor-svc-scaffolding.git2. Execute the script
Example output (without any command line arguments).
$ cd supervisor-svc-scaffolding
$ ./supsvc-scaffold.sh
This script must be run with two arguments.

Usage: ./supsvc-scaffold.sh name-of-supervisor-service version-details[x.y.z]

Example: ./supsvc-scaffold.sh argocd-operator 0.8.0
Run the script with a name for the supervisor service you want to create and the version number. Note: Once the entire process is completed, a Supervisor Namespace — svc-[name-of-supervisor-service]-[supervisor-domain-id] will be created, and the application will reside in that namespace.
$ ./supsvc-scaffold.sh argocd-operator 0.8.0


1. Download/Create your argocd-operator product binaries, repositiories and other artifacts to the [[argocd-operator/distribution]] folder.

2. Create, modify and update the Kubernetes manifest in the distrubution folder. Once the required Kubernetes manifest files are ready, please move all the YAML manifests to [[argocd-operator/config/_ytt_lib/bundle/config/upstream]] folder.

3. Sample namespace modification YTT overlay is provided in the [[argocd-operator/config/_ytt_lib/bundle/config/overlays]] folder.

4. Modify and update the config as needed. Once completed, use kctrl to create the required repositories and artifacts. kctrl will need write access to a registry to upload the artifacts.

Sample commands provided for reference -
---
kctrl package init
kctrl package release --openapi-schema --version 0.8.0 --build-ytt-validations
Here is a snapshot of the files and folders created by the scaffolding script.
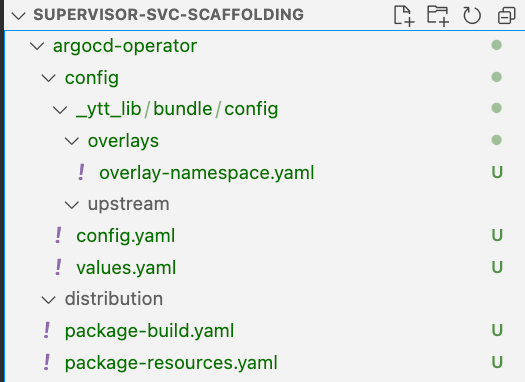
- The
argocd-operator/configfolder is where all the package files will reside. argocd-operator/config/_ytt_lib/bundle/config/overlays/overlay-namespace.yamlis a sampleYTToverlay file that customizes the namespace reference for the supervisor services during installation. More overlays can be added to theargocd-operator/config/_ytt_lib/bundle/config/overlays/folder per the product and user customization requirements.argocd-operator/config/_ytt_lib/bundle/config/upstream/folder is where all the upstream Kubernetes manifest files for the application are stored.argocd-operator/distribution/folder has been created as a placeholder to help download and expand the application's artifacts from the internet, such as a helm chart or a GitHub release download. Once modifications have been made to the files within the distribution folder, the user is required to copy the final manifest files to theargocd-operator/config/_ytt_lib/bundle/config/upstream/folder (see above)argocd-operator/config/config.yamlandargocd-operator/config/values.yamlare standard configuration files needed for the build process to reference the overlays and upstream folders. In most scenarios, we will not need to modify these files.argocd-operator/package-build.yamlandargocd-operator/package-resource.yamlare the YAML manifests required bykctrlto process the build. We may need to edit these files. More on this later.
3. Download ArgoCD-Operator
Now that we have the directory structure created, we will download the argocd-operator from ArgoCD-Operator Releases to the argocd-operator/distribution/ folder. As specified earlier, we will be downloading the 0.8.0 release. Expand the downloaded files as needed.
$ cd argocd-operator/distribution
$ wget https://github.com/argoproj-labs/argocd-operator/archive/refs/tags/v0.8.0.tar.gz
...
connecting to codeload.github.com (codeload.github.com)|20.29.134.24|:443... connected.
HTTP request sent, awaiting response... 200 OK
Length: unspecified [application/x-gzip]
Saving to: ‘v0.8.0.tar.gz’

v0.8.0.tar.gz                                [     <=>                                                                        ]   4.67M  4.94MB/s    in 0.9s

2024-01-17 13:25:24 (4.94 MB/s) - ‘v0.8.0.tar.gz’ saved [4899799]

$ tar -xzvf v0.8.0.tar.gz
...

$ cd argocd-operator/distribution/argocd-operator-0.8.0/config/default
4. Modify manifest files as per the deployment requirements
Make necessary modifications based on your deployment requirements. In our example, after expanding the release, the required Kustomization folder to generate the final manifest is in argocd-operator/distribution/argocd-operator-0.8.0/config/default.
In our example, we do not want to enable Webhook on the Operator. Edit the kustomization.yaml file and change the following from -
# [WEBHOOK] To enable webhook, uncomment all the sections with [WEBHOOK] prefix including the one in
# crd/kustomization.yaml
- ../webhook
# [CERTMANAGER] To enable cert-manager, uncomment all sections with 'CERTMANAGER'. 'WEBHOOK' components are required.
#- ../certmanager
# [PROMETHEUS] To enable prometheus monitor, uncomment all sections with 'PROMETHEUS'.
# - ../prometheus

...

# [WEBHOOK] To enable webhook, uncomment all the sections with [WEBHOOK] prefix including the one in
# crd/kustomization.yaml
- manager_webhook_patch.yaml
to -
# [WEBHOOK] To enable webhook, uncomment all the sections with [WEBHOOK] prefix including the one in
# crd/kustomization.yaml
# - ../webhook
# [CERTMANAGER] To enable cert-manager, uncomment all sections with 'CERTMANAGER'. 'WEBHOOK' components are required.
#- ../certmanager
# [PROMETHEUS] To enable prometheus monitor, uncomment all sections with 'PROMETHEUS'.
# - ../prometheus

...

# [WEBHOOK] To enable webhook, uncomment all the sections with [WEBHOOK] prefix including the one in
# crd/kustomization.yaml
# - manager_webhook_patch.yam
Now that we have the issues addressed build the consolidated manifest.
$ kubectl kustomize > argocd-operator.yamlIMPORTANT: We must add a new ClusterRole to allow SSO users to deploy ArgoCD Instances and CR in a Supervisor Namespace. This can be done by appending the following YAML at the end of the argocd-operator.yaml created in the previous step.
---
apiVersion: rbac.authorization.k8s.io/v1
kind: ClusterRole
metadata:
  name: wcp:argocds-view
  namespace: argocd-operator-system
  labels:
    rbac.authorization.k8s.io/aggregate-to-view: "true"
rules:
  - apiGroups:
      - argoproj.io
    resources:
      - argocds
    verbs:
      - '*'
I also discovered some issues with creationTimestamp: “null”that Kubernetes/Kapp does not honor. All references to “null” had to be changed to null (without quotes) !!! There were two instances of such changes in argocd-operator.yaml.
apiVersion: apiextensions.k8s.io/v1
kind: CustomResourceDefinition
metadata:
  annotations:
    controller-gen.kubebuilder.io/version: v0.6.1
  creationTimestamp: "null"
  name: argocdexports.argoproj.io
to
apiVersion: apiextensions.k8s.io/v1
kind: CustomResourceDefinition
metadata:
  annotations:
    controller-gen.kubebuilder.io/version: v0.6.1
  creationTimestamp: null
  name: argocdexports.argoproj.io
5. Copy the file to the Upstream folder.
Copy the final application manifest to the ArgoCD-Operator releases directory.
cp argocd-operator.yaml ../../../../config/_ytt_lib/bundle/config/upstreamIMPORTANT: Since the argocd-operator/config/_ytt_lib/bundle/config/overlays/overlay-namespace.yaml had a placeholder value for the expected namespace in the upstream manifest; we need to edit the file and modify the values to match the namespace in the upstream manifest. In our example, the scaffolding-generated value in the overlay-namespace.yaml file was argocd-operator. We need to change all the references to argocd-operator-system, as in the upstream manifest.
#@ load("@ytt:data", "data")
#@ load("@ytt:overlay", "overlay")

#@overlay/match by=overlay.subset({"kind":"Namespace", "metadata": {"name": "argocd-operator-system"}})
---
apiVersion: v1
kind: Namespace
metadata:
  name: #@ data.values.namespace

#@overlay/match by=overlay.subset({"metadata": {"namespace": "argocd-operator-system"}}), expects="0+"
---
metadata:
  namespace: #@ data.values.namespace

#@ crb=overlay.subset({"kind":"ClusterRoleBinding"})
#@ rb=overlay.subset({"kind":"RoleBinding"})
#@overlay/match by=overlay.or_op(crb, rb), expects=3
---
subjects:
#@overlay/match by=overlay.subset({"namespace": "argocd-operator-system"})
- kind: ServiceAccount
  namespace: #@ data.values.namespace
6. Run kctrl to initialize and release the kapp package
Use kctrl to build the ArgoCD-Operator artifacts. Accept the defaults as needed.
Step 1.
Note: Do not modify the package name — argocd-operator.fling.vsphere.vmware.com . The naming standard is critical for the application to be accepted and deployed in the Supervisor as a Supervisor Service.
$ cd ../../../..
# Back to the argocd-operator folder
$ kctrl package init

Welcome! Before we start, do install the latest Carvel suite of tools,
specifically ytt, imgpkg, vendir and kbld.

Basic Information
A package reference name must be at least three '.' separated segments,e.g.
samplepackage.corp.com
> Enter the package reference name (argocd-operator.fling.vsphere.vmware.com):

Content
Please provide the location from where your Kubernetes manifests or Helm chart
can be fetched. This will be bundled as a part of the package.
1: Local Directory
2: Github Release
3: Helm Chart from Helm Repository
4: Git Repository
5: Helm Chart from Git Repository
> Enter source (1):

We need to include files/ directories which contain Kubernetes manifests.
Multiple values can be included using a comma separator.
> Enter the paths which contain Kubernetes manifests (./config):

Output
Successfully updated package-build.yml
Successfully updated package-resources.yml

Next steps
Created files can be consumed in following ways:
1. `package release` command to release the package.
2. `package release --repo-output repo` to release the package and add it to the
package repository directory.

Succeeded
Step 2.
Note: You will also need access to a registry. Ensure you have write access and have logged into the registry using docker login. In this example, my registry is harbor.navneet.pro, and the path where the build manifest will be saved is harbor.navneet.pro/library/argocd-operator
$ kctrl package release --openapi-schema --version 0.8.0 --build-ytt-validations

Prerequisites
1. Host is authorized to push images to a registry (can be set up by running
`docker login`)
2. `package init` ran successfully.

The bundle created needs to be pushed to an OCI registry. (format:
<REGISTRY_URL/REPOSITORY_NAME>) e.g. index.docker.io/k8slt/sample-bundle
> Enter the registry URL (harbor.navneet.pro/library/argocd-operator):

kbld builds images when necessary and ensures that all image references are
resolved to an immutable reference
Building images and resolving references
     | $ ytt -f /var/folders/4_/x04767093bq3r5lkn0tnl1pw0000gq/T/kapp-controller-fetch-template-deploy2844235578/0/config
     | $ kbld -f - --imgpkg-lock-output=.imgpkg/images.yml

An imgpkg bundle consists of all required manifests bundled into an OCI image.
This image is pushed to a registry and consumed by the package.
Pushing imgpkg bundle
     | $ imgpkg push -b harbor.navneet.pro/library/argocd-operator:build-1705521456 -f ./bundle-harbor.navneet.pro-library-argocd-operator:build-1705521456-426707091 --tty=true
     | dir: .
     | dir: .imgpkg
     | file: .imgpkg/images.yml
     | dir: config
     | dir: config/_ytt_lib
     | dir: config/_ytt_lib/bundle
     | dir: config/_ytt_lib/bundle/config
     | dir: config/_ytt_lib/bundle/config/overlays
     | file: config/_ytt_lib/bundle/config/overlays/overlay-namespace.yaml
     | dir: config/_ytt_lib/bundle/config/upstream
     | file: config/_ytt_lib/bundle/config/upstream/argocd-operator.yaml
     | file: config/config.yaml
     | file: config/values.yaml
     | Pushed 'harbor.navneet.pro/library/argocd-operator@sha256:3fb7b67b3d4cf001d0a808f5363829b886cd6c078aff9442b05c70069dd57a40'
     | Succeeded
Artifact created: carvel-artifacts/packages/argocd-operator.fling.vsphere.vmware.com/metadata.yml
Artifact created: carvel-artifacts/packages/argocd-operator.fling.vsphere.vmware.com/package.yml

Next steps
1. The artifacts generated by the `--repo-output` flag can be bundled into a
PackageRepository by using the `package repository release` command.
2. Generated Package and PackageMetadata manifests can be applied to the cluster
directly.

Succeeded
Once the package is built/released, a new directory structure will be created under argocd-operator folder. This folder contains two YAML files that must be concatenated to produce the final Supervisor Service deployment manifest.
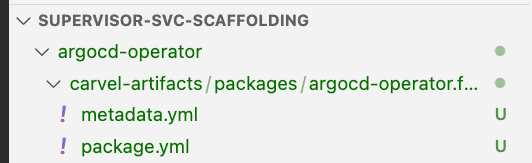
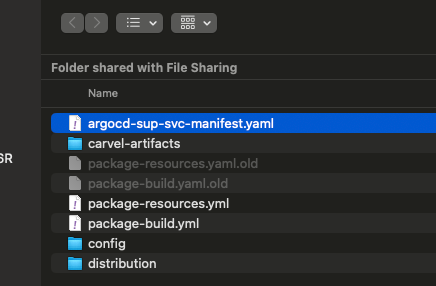
$ cp carvel-artifacts/packages/argocd-operator.fling.vsphere.vmware.com/metadata.yml argocd-sup-svc-manifest.yaml
$ echo --- >> argocd-sup-svc-manifest.yaml
$ cat carvel-artifacts/packages/argocd-operator.fling.vsphere.vmware.com/package.yml >> argocd-sup-svc-manifest.yaml
7. Use the vCenter Workload Management Interface to upload the manifest
Navigate to the vCenter Workload Management -> Services menu to add, register, and install the new Supervisor Services.

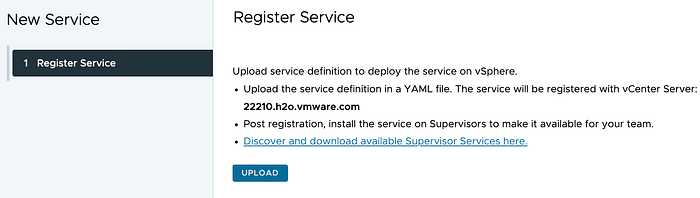
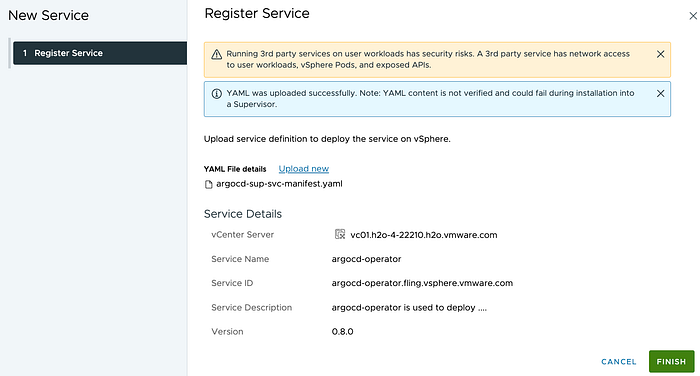
This operation should take a few minutes, and the ArgoCD-operator deployment should run on the Supervisor.
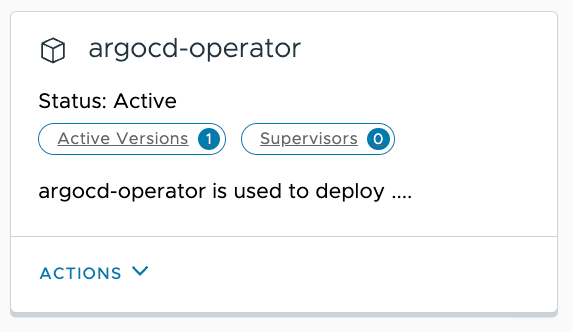
Result
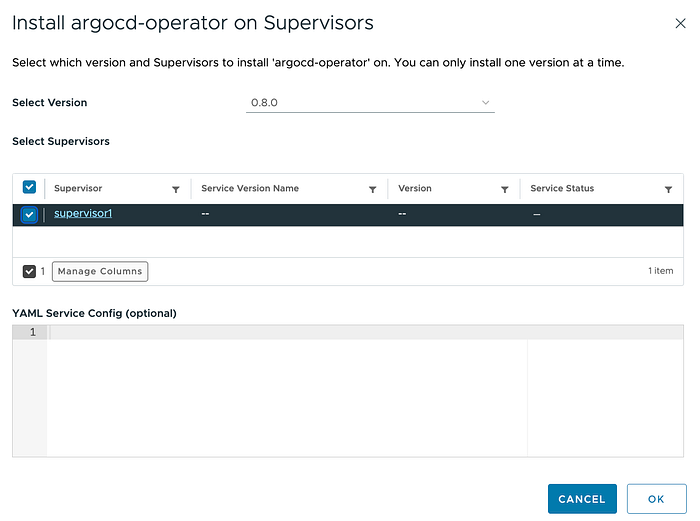
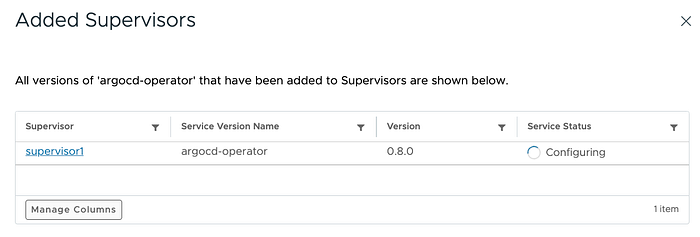
After completing the steps, validate that the ArgoCD-Operator is running successfully.
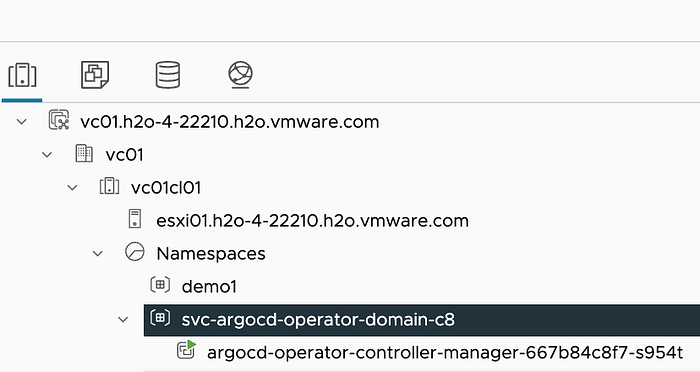
Now that the Operator runs successfully, we can deploy an ArgoCD instance using the Operator. We have a pre-created Supervisor Namespace demo1 that will be used to deploy the ArgoCD instance. In this example, we will use a straightforward instance. The ArgoCD instance will be called demo1-argocd, and its UI will be exposed as a service type LoadBalancer.
apiVersion: argoproj.io/v1beta1
kind: ArgoCD
metadata:
  name: demo1-argocd
  namespace: demo1
  labels:
    example: basic
spec:
  nodePlacement:
    nodeSelector:
      kubernetes.io/os: CRX
  server:
    host: demo1-argocd
    service:
      type: LoadBalancer
$ kubectl apply -f deploy-argocd.yaml
argocd.argoproj.io/demo1-argocd createdTo access the ArgoCD UI/CLI, we need to get the LoadBalancer IP address. 10.220.3.197 in our example.
$ kubectl get svc -n demo1
NAME                          TYPE           CLUSTER-IP    EXTERNAL-IP    PORT(S)                      AGE
...
demo1-argocd-repo-server      ClusterIP      10.96.1.134   <none>         8081/TCP,8084/TCP            6m10s
demo1-argocd-server           LoadBalancer   10.96.1.0     10.220.3.197   80:30552/TCP,443:30359/TCP   6m9s
demo1-argocd-server-metrics   ClusterIP      10.96.0.131   <none>         8083/TCP                     6m10s
To get the default admin password, run the following command -
$ kubectl -n demo1 get secret demo1-argocd-cluster -o jsonpath='{.data.admin\.password}' | base64 -d
zeX2aD4hDDBVSDSD8KRnOIisDM0FutE
To update the admin password for the ArgoCD instance, execute the following command —
$ kubectl -n demo1 patch secret demo1-argocd-cluster -p '{"stringData": { "admin.password": "Sup3rS3cr3t!" }}'
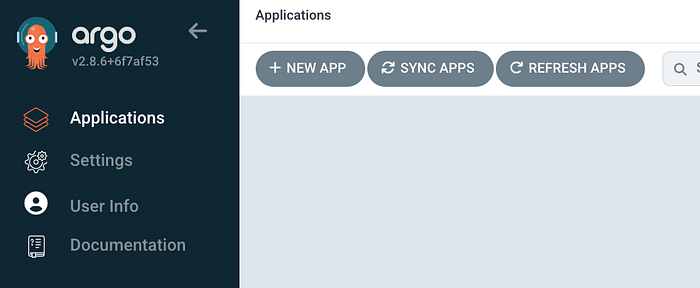
secret/demo1-argocd-cluster patchedOpen a browser window and navigate to the LoadBalancer IP 10.220.3.197 and log in with the admin credentials.
Conclusion
Authoring and installing ArgoCD-Operator as a Supervisor Service on vCenter combines the efficiency of Kubernetes operators with the simplicity of vSphere Supervisor Services.
Using this methodology, I could author and deploy numerous operators as Supervisor services such as MongoDB and Postgres. I will be providing the necessary recipes soon. I encourage readers to try their deployments and share the results.
